Your CURTA Calculator
(since April 22, 1997) Last Update: August 17, 2021 -- THE CURTA REFERENCE
 |
Your CURTA Calculator is a high-quality precision instrument, fitted with automatic safety locks to prevent operator's errors. Therefore, to obtain best results and efficient service from your machine, never handle roughly or attempt to force its mechanism. Learning how to operate the CURTA is actually very simple; all you have to do is to follow step by step and in the sequence set out the instructions and exercises that follow. Should your CURTA require servicing or repair, it's essential that you entrust your machine only to an authorized CURTA agency. On no account should you attempt to repair or even to lubricate your CURTA yourself. |
|
|
|
| The instructions and exercises herein apply both to CURTA model I (8 x 6 x 11 digits) and CURTA model II (11 x 8 x 15 digits). These two models being identical but for their capacity, it has been deemed sufficient to represent only CURTA model I on the illustrations. | |
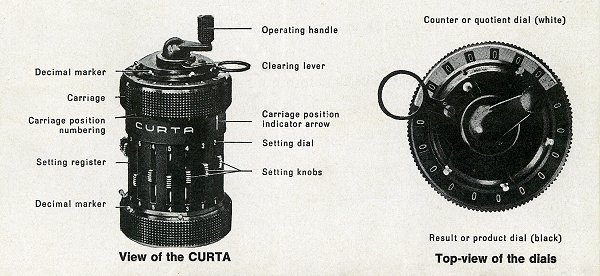
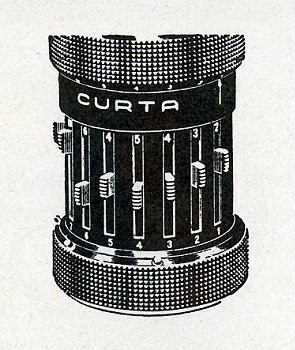
Key Parts:
|
|
|
|
|
|
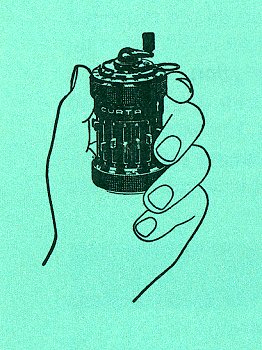
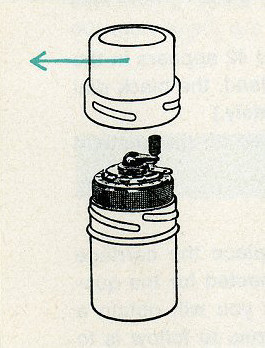
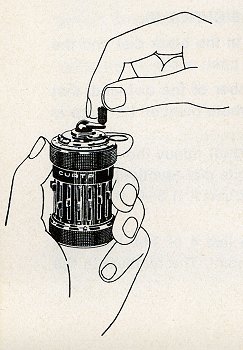
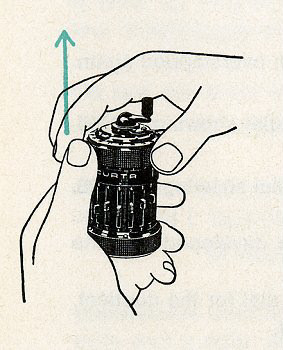
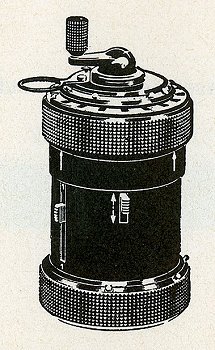
How to Operate your CURTA1 The ContainerTo open turn the lid toward the left. Remove the machine. When operating hold the machine in your left hand, with thumb and forefinger gripping the upper knurled ring and the base of the machine resting in the palm of your hand (see picture top left). |
|
|
|
|
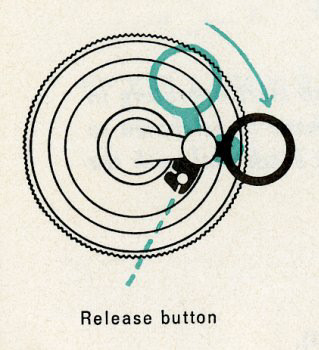
2 The Clearing LeverWhen pulled out as indicated by the blue arrow, the clearing lever is in working position. Before storing the machine in its container, press release button and at the same time push clearing lever backward. |
|
|
|
|
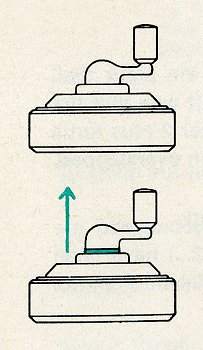
3 The Operating HandleTurn the handle clockwise only -- it is always locked against backward turns and any attempt to force the handle to turn backwards may damage the machine. One full turn is complete when the handle is again checked in its zero stop position. In its zero stop position the handle can be pulled upward (showing a white or red sleeve at its base) for subtractive (minus) turns, or pushed down again in its lower or normal position for additive (plus) turns. The handle must always be brought into its zero stop position before manipulating any other parts of the machine.
|
|
|
|
|
ExerciseTurn the handle several times while it is in its lower or normal position (plus turns) and also pulled out in its upper position (minus turns). To finish don't forget to leave the handle in its zero stop.
|
|
|
|
|
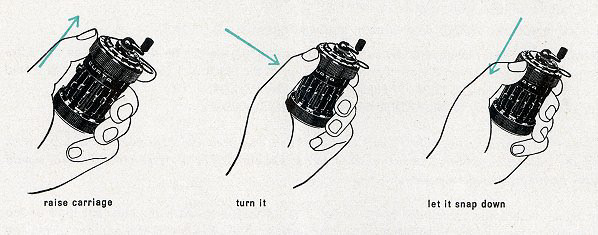
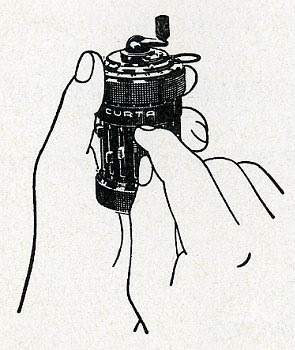
4 The carriageis the upper knurled ring of the machine which you grip with thumb and forefinger (see picture top left). The white arrow on the front of the machine indicates the positions of the carriage, which are numbered on its lower edge. To move the carriage from one position to another, make sure the handle is in its zero stop, raise the carriage straight upward, then turn it until the indicator arrow points to the required position and let the carriage snap down into its lower position.
|
|
|
|
|
ExercisePractice moving the carriage first using both hands. As soon as the movement is familiar, learn to move the carriage only with thumb and forefinger of your left hand (in which you hold the machine):
|
|
|
|
|
Starting from position 1 move the carriage to positions 2, 3, 4, 5, 6 and finally replace it in position 1. Moving the carriage with one hand only insures fast operation.
Important: The carriage can be raised only when the operating handle is in its zero stop. While the carriage is raised, the operating handle is locked and can only be turned once the carriage has snapped down into its lower position.
|
|
|
|
|
|
5 The setting knobsare numbered at the bottom of the setting register. When pushed right up, they are in their zero position and immediately above each knob the corresponding slot of the setting dial then shows zero. Moving a knob downward, any number from 1 - 9 can be set and checked in the corresponding setting dial slot above. When setting a number with several digits, each digit is set with one of the knobs, so that the number desired can be checked by reading it from left to right in the setting dial.
|
|
|
|
|
ExerciseSet the number 149 as follows: With the thumb of the left hand or the forefinger of the right hand pull knob 1 right down until the 9 appears in the dial slot above; with knob 2 set the "4" and with knob 3 the "1". Turn the handle once and make sure you leave it in its zero stop.
|
|
|
6 The counting dials
are located in a circle around the top of the machine. The black dial is the result or product dial, the white dial is the counter or quotient dial (see picture top right).
|
|
|
|
|
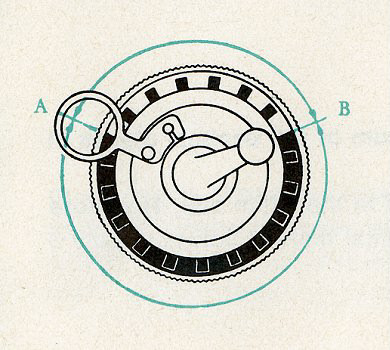
7 Clearing the dialsis done with the clearing lever (see fig 2), which has two stop positions (A and B), located at the two points where the black and the white dials meet.
To clear both dials raise the carriage with thumb and forefinger of the left hand and with the forefinger of the right hand move the clearing lever steadily around the dials, bringing it back to its initial stop position. |
|
|
|

|
Important: After clearing the clearing lever must always be located in one of its two stop positions (A or B), otherwise the carriage will not snap down and the operating handle will remain locked. Before starting the next exercise, please turn the handle several times.
To clear one of the dials only, raise the carriage as previously, then move the clearing lever around the respective dial (black or white) only to its second stop position and let the carriage snap down again. Only one of the dials has been cleared.
|
|
|
|
|
8 The reversing leverat the back of the machine has two working positions: the upper is the normal position for all current types of calculations; the lower is to be used only in special cases, particularly for subtractions, division by the subtractive method and direct multiplication of a quotient in the white dial by a number set on the setting register. |
|
|
|
Sales Agency:Manufacturer:
CONTINA Manufactury of Office and Calculating Machines Ltd. |
|
1. Machine ready!
2. Setting register: with knob 1 set the "4" and with knob 2 set the "5" :54.
3. Handle: each turn of the handle transfers the set number once into the black dial (result dial). The multiplier 3 is therefore developed with 3 plus turns (lower or normal position of the handle), which will be registered in the white dial (counter dial).
Answer: Black dial: 162
Check: Setting dial: 54, White dial: 3
1. Machine ready!
2. Setting register: with knobs 1 to 3 set "647".
3. Handle: 5 plus turns. Looking at the white dial, you will notice that a 5 has been developed, which is the lowest digit of the number 125.
4. Carriage: position 2. In this carriage position each turn of the handle transfers the set number ten times into the black dial.
5. Handle: 2 plus turns. The white dial shows 25. The first two digits of the number 125 have now been developed.
6. Carriage: position 3 (hundreds digit).
7. Handle: 1 plus turn.
Answer: Black dial: 80875
Check: White dial: 125, Setting dial: 647
1. Machine ready!
2. Setting register: with knobs 1 to 3 set '136". For marking the decimal point use one of the white mobile decimal markers (see picture "view of the CURTA"). Place one of the decimal markers at the base of the machine between the setting columns 1 and 2 and read 13.6.
3. Handle: 5 plus turns
4. Carriage: position 2
5. Handle: 1 plus turn
6. Carriage: position 3
7. Handle: 1 plus turn
8. White dial: set a decimal marker between the second and the third dial slot and read 1.15.
The number of decimal places in the black dial is equal to the sum of the decimal places in the setting dial and the white dial.
In this example we have 1 decimal place in the setting dial and 2 in the white dial. Therefore in the black dial we have 1 + 2 = 3 decimal places. Set a decimal marker between slots 3 and 4 in the black dial.
Answer: Black dial: 15.640
Check: Setting dial: 13.6, White dial: 1.15
1. Machine ready!
2. Setting register: with knobs 1 to 3 set 457". Normally we would now make 9 turns of the handle with the carriage in position 1 and 8 turns with the carriage in position 2, that is all together 17 turns of the handle. The same calculation can be done, however, with only 3 turns of the handle. 89 = (100 - 11) or ( -11 + 100). We therefore calculate 457 x ( -1 - 10 + 100).
3. Handle: 1 minus turn (with handle in upper position): = -1
4. Carriage: position 2
5. Handle: 1 minus turn: = -10
6. Carriage: position 3
7. Handle: 1 plus turn (with handle down in its normal position): = +100
Answer: Black dial: 40673
Check: White dial: 89, Setting dial: 457
This short-cut method is recommended whenever the numbers to be developed for the multiplier are 6, 7, 8, or 9. It will save considerable time and effort.
1. Machine ready!
2. Setting register: with knobs 1 to 3 set "237".
3. Handle: 1 plus turn.
4. Setting register: with knobs 1 to 3 set "419". It is unnecessary to push back all the knobs to their zero position first. Merely adjust each knob until the required numbers appear in the setting dial.
5. Handle: 1 plus turn.
Answer: Black dial: 656
Check: White dial: 2, (Number of items added)
1. Machine ready!
2. Setting register: with knobs 1 to 3 set "139".
3. Handle: 1 plus turn.
4. Setting register: with knobs 1 and 2 set 78; push knob 3 to zero position.
5. Handle: 1 minus turn (with handle in upper position).
Answer: Black dial: 61 *
* Remark: If a check of the number of items added and subtracted is required the reversing lever (see fig 8 front page) has to be moved into its lower position before doing a minus turn and moved back to its upper position for plus turns.
1. Machine ready!
2. Setting register: place a decimal marker between knobs 2 and 3. With knobs 1 to 4 set 11.35".
3. Handle: 1 plus turn.
4. Black dial: place 1 decimal marker between the second and the third dial slot.
5. Setting register: with knobs 1 to 3 set "6.70"; push knob 4 up to zero position.
6. Handle: 1 plus turn.
7. Setting register: with knobs 1 to 3 set "3.94".
8. Handle: 1 minus turn.
Answer: Black dial: 14.11
The divisor 7 is set in the setting register and plus turns of the handle are made until the dividend 42 is built up in the black dial. The white dial registers each turn made. It indicates how often the divisor is contained in the dividend and thus shows the quotient.
1. Machine ready! (reversing lever in upper position!).
2. Setting register: with knob 1 set "7" (Divisor).
3. Handle: while watching the black dial make plus turns until the dividend 42 appears in the black dial. (If by doing a turn too many you overstep the required dividend, the black dial showing e. g. 49, you will have to make each time a minus turn immediately.)
As soon as the number 42 (dividend) appears in the black dial you can read off the quotient 6 in the white dial.
Answer: White dial: 6 (quotient)
Check: Black dial: 42 (dividend), Setting dial: 7 (divisor)
For divisions giving quotients with several digits, before operating
you place the carriage into one of its higher positions, corresponding to the
number of digits expected for the quotient. If, for instance, you start operating
with the carriage in position 3 you will obtain a quotient of 3 digits.
However, to avoid unnecessary thinking, the general rule to follow is to start
every division with the carriage in its highest position (pos. 6 for CURTA I
and pos. 8 for CURTA II). As soon as the required degree of accuracy
(number of digits) for the quotient has been attained or when the division
finishes you break off the calculation as the following example will show.
Remark: When the divisor is a large number it mill not always be possible to start operating in the highest position of the carriage and one of the next lower positions will have to be chosen so that all the digits of the divisor are transferred into the left-hand part of the black dial with the first plus turn of the handle.
1. Machine ready!
2. Setting register: with knobs 1 and 2 set 12".
3. Carriage: place in its highest position (pos. 6 CURTA I, pos. 8 CURTA II).
4. Handle: plus turns until the dividend 1728 is attained or overstepped in the black dial.
When the dividend has several digits as in this case, it is sufficient to start with that the first 2 or 3 highest digits of the dividend are reached in the black dial. After 2 plus turns the black dial shows 24...0. The first 2 digits (17...) of the dividend have been overstepped. One minus turn (the black dial now shows 12...0).
5. Carriage: place in the next lower position (pos. 5 CURTA I; pos. 7 CURTA II).
6. Handle: after 5 plus turns the first three highest digits of the dividend (172...) have been overstepped, the black dial showing 180...0. 1 minus turn. (The black dial now shows 168...0.)
7. Carriage: place in the next lower position (pos. 4 CURTA I; pos. 6 CURTA II).
8. Handle: after 4 plus turns the dividend 1728 has been reached in the black dial and the calculation can be broken off.
9. Black dial: set a decimal marker after the last whole number of the dividend, that is immediately behind the "8 . In the setting dial we have the whole number 12; there is no need to set a decimal marker.
Decimal rule for divisions: the decimals in the black dial (dividend) minus the decimals in the setting dial (divisor) give the number of decimals in the white dial (quotient).
In this case with CURTA I we find 3 - 0 = 3 decimal places and with CURTA II 5 - 0 = 5 decimal places in the white dial.
10. White dial: set a decimal marker immediately behind the last 4 of 144, leaving 3 zeros for CURTA I and 5 zeros for CURTA II after the decimal point. The quotient in the white dial is 144.0...
Answer: White dial: 144.0... (quotient)
Check: Black dial: 1728 (dividend), Setting dial: 12 (divisor)
For divisions that do not finish it is sufficient to attempt building up in the black dial a number that comes as near as possible to the given dividend. To start with the decimals of the dividend and the divisor are not taken into consideration.
1. Machine ready!
2. The instructions of the previous example (1728 / 12) are to be followed exactly up to and including fig 7. Then continue as follows:
3. Handle: after 5 plus turns, the black dial showing 1740, the dividend has been over-stepped. 1 minus turn.
4. Carriage: place into next lower position.
5. Handle: after 1 plus turn, the black dial showing 17292, the dividend has been overstepped again. 1 minus turn.
6. Carriage: place into next lower position.
Handle: after 9 plus turns, the black dial showing 172908, the dividend has been overstepped. 1 minus turn.
7. Carriage: place into next lower position.
Handle: after 4 plus turns, the black dial showing 1729008, the dividend has been overstepped. 1 minus turn.
With CURTA model I the 6 digits of the white dial have now been developed and the calculation is finished.
With CURTA model II another 2 digits can be developed in the white dial for the quotient, since the carriage can be moved to 2 further positions (pos. 2 and 1).
8. Carriage: place into next lower position.
Handle: 4 plus turns, 1 minus turn.
9. Carriage: place into next lower position.
Handle: 4 plus turns, 1 minus turn.
The 8 digits of the white dial are now developed and the calculation is finished.
10. Markers: Set the decimal markers: in the setting dial between columns 2 and 1 (1.2), and in the black dial immediately after the last whole number of the dividend, that is behind the "7" (17.289...). Applying the decimal rule we find for the white dial of CURTA I 5 - 1 = 4 decimal places, and for that of CURTA II 7 - 1 = 6 decimal places.
Answer: White dial: 14.4083[33] (quotient)
Check: Black dial: 17.2899..6 (dividend), Setting dial: 1.2 (divisor)
Remainder: When closing the division the remainder can always be determined as the difference between the given dividend and the number in the black dial. Here the remainder would be for CURTA model I: 17.29 - 17.28996 = remainder 0.00004;
for CURTA model II: 17.29 - 17.2899996 = remainder 0.0000004.
(Remark: If, for instance, only 3 digits of the quotient bad been asked for you could have broken off the calculation when 17.28 was reached in the black dial. The corresponding quotient would have been 14.4 and the remainder 0.01.)
In cases where the remainder is irrelevant it is advisable to work out the last digit of the quotient to the highest possible accuracy by leaving in the black dial the number giving the nearest approximation to the required dividend. Those who are already familiar with calculating machines can equally well divide by the subtractive method for which they will have to set the reversing lever (fig 8 front page) into its lower position. The decimal rule remains unaltered. Division by the subtractive method is however advisable only in cases where the dividend is already in the left-hand side of the black dial as a result of some previous operation (f. ex. an addition or multiplication, see CURTA Computing Ex. p. 7).